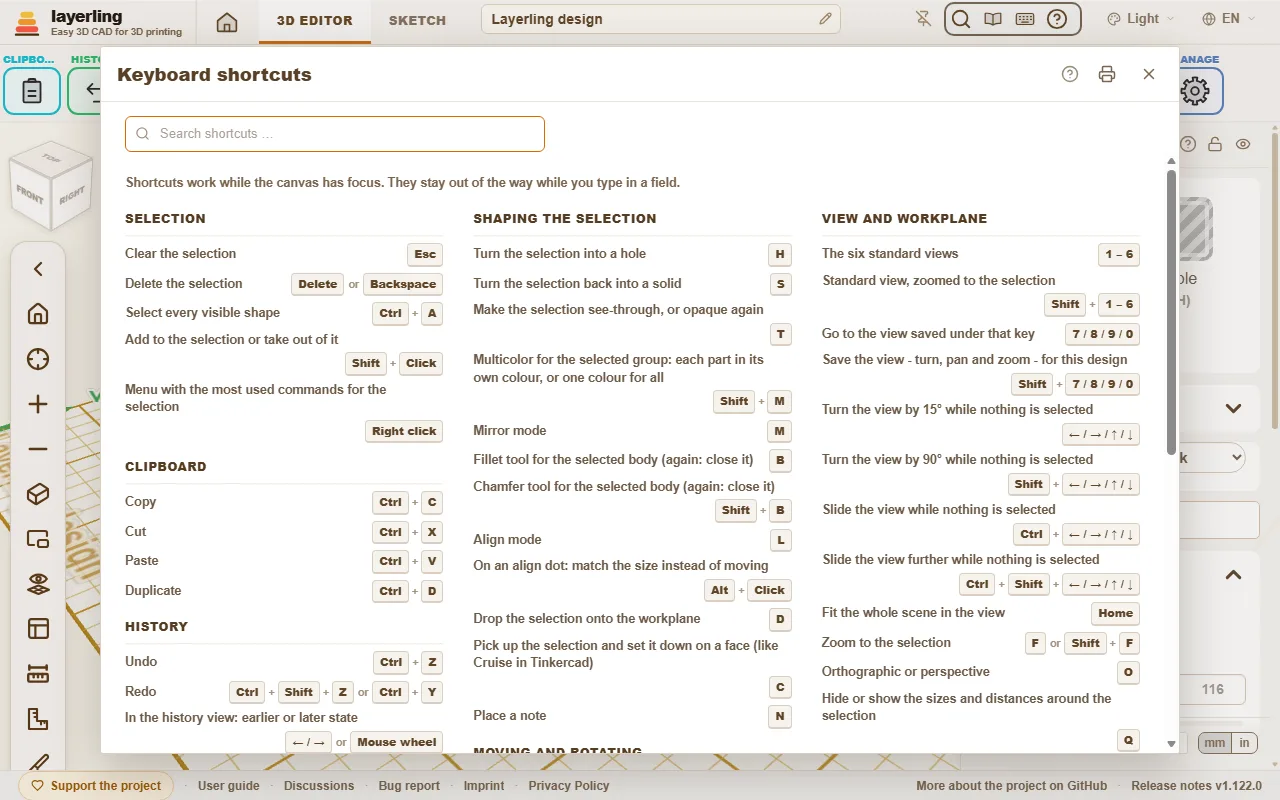
The shortcuts work as long as the workplane has the focus. While you type in a field they keep out of the way. On the Mac, Cmd applies wherever Ctrl is listed here.
In the editor, “Keyboard shortcuts” in the “Help” area opens the same list as a window. The printer button in the window (“Print or save as PDF”) prints the list on its own, black on white, the whole list on one side of an A4 or Letter sheet in three columns, to keep at hand as a quick reference; the print dialog of the browser also offers to save it as a PDF.
The box at the top of the window searches the list: it keeps only the shortcuts whose sentence, group or keys contain every word you type, so "fillet" or "ctrl+z" leaves just those rows. Capital letters and accents do not matter, and a single letter or digit finds that key and the words that start with it. The X at the end of the box empties it; with the box empty the whole list is back. The printer button prints what the window shows, so after a search it prints only the shortcuts found.
The keyboard shortcuts window in the editor.
Command search
Can't find a tool? Press Ctrl+K or click the magnifying glass in the “Help” area, then type what you are looking for: a tool ("fillet", "mirror"), a shape ("cylinder") or a command ("export", "undo"). Move with the arrow keys and press Enter, or click the entry.
The search understands the English and the German word alike and ignores capital letters and umlauts: "aushoehlen" finds “Hollow”.
Every entry shows the keys that do the same and the group of the ribbon it lives in, so you learn where it is.
Entries that are greyed out cannot run right now, mostly because nothing is selected. They stay in the list so the search still tells you where the tool is.
The guide you are reading has a search box too, at the top of every page: type a word or two and it lists the sections that contain all of them, with the matching words marked. Click one, or press Enter for the first, to jump straight there. The page it opens marks every place your words appear and scrolls to the first one in that section; Esc or a click on a mark clears them.
A shape's name adds that shape to the workplane, just like clicking it in the shapes menu.
With an empty field the search lists the commands you used last at the top.
The name of a body in your design finds that body and selects it, which helps in a design with many parts. Bodies only appear once you type.
It works in sketch mode as well, with the sketch tools.
Your own keys
Any command of the command search can go on a key of your own: a tool you use all the time, a shape, “Center on workplane” or “Open the shapes panel”.
Open “Keyboard shortcuts” and click “Add a key” under “Your own keys” at the top of the window.
Type a few letters of the command and click it, or press Enter for the first one.
Press the key you want, alone or with Ctrl, Alt or Shift. Letters, digits and F1 to F12 can take a command.
A key the editor already uses, one the browser keeps for itself (such as Ctrl+W) or one of your own keys is refused, and the window says what it does. Click a key in the list to change it, the X next to it to remove it, or “Remove all my keys” to start over.
The key runs the command just as the command search does. If it cannot run right now, mostly because nothing is selected, the status bar says so.
Your keys show next to their commands in the command search and on the printed list.
They stay in this browser, like the theme. A key for a sketch tool works in sketch mode, a key for the 3D editor outside it.
While you type in a field, your keys keep out of the way like all the others.
Interactive Help
Cannot find where to read about a button or a field? Let the program take you there. Click the question mark in the “Help” area, or press Shift+F1. The pointer turns into a question mark, and whatever lies under it is outlined.
Click a button, a field, a switch, a handle, a group of the ribbon or the title bar of a window. It does not do what it normally does. A small window opens instead, with the name of the element, a short summary of the part of this guide that is about it, up to two more places that mention it, and “Open in the guide”.
The help is about the element you pointed at, not about the whole window around it. An element without a name of its own uses the nearest one around it; inside a window it falls back on that window's question mark.
“Open in the guide” opens the guide at that section in a new tab. There the section is outlined in colour, from its heading to its end, so you see where it starts and stops.
If the guide says nothing about the element, the window says so and offers “Search the guide”.
Esc, or the question mark again, leaves the mode. On a touch screen there is no hover: a tap on an element opens the window straight away.
The window moves by its title bar like the other windows. The program finds the section by the name of the element - the label on a button, the name of a field - because this guide writes every button as it is called in the program. It looks it up in the same search as the box at the top of each guide page, in the language you are using, and runs entirely in your browser.
Selection
Esc
Clear the selection
Delete or Backspace
Delete the selection
Ctrl+A
Select every visible shape
Shift+Click
Add to the selection or take out of it
Right click
Menu with the most used commands for the selection
Clipboard
Ctrl+C
Copy
Ctrl+X
Cut
Ctrl+V
Paste
Ctrl+D
Duplicate
History
Ctrl+Z
Undo
Ctrl+Shift+Z or Ctrl+Y
Redo
← / → or Wheel
In the history view: earlier or later state
PgUp / PgDn
In the history view: ten states earlier or later
Home / End
In the history view: oldest state or the current one
Esc
In the history view: back to the current state
File
Ctrl+I
Open or close the import dialog
Ctrl+E
Open or close the export dialog
Ctrl+S
Save the design into its file
Grouping and visibility
Ctrl+G
Group
Ctrl+B
Bundle (hold together without merging)
Ctrl+Shift+G
Ungroup or unbundle
E
Edit the selected group
Ctrl+L
Lock or unlock the selection
Ctrl+Shift+L
Lock or unlock the shape only: the part still moves, turns and groups
Ctrl+H
Hide the selection
Ctrl+Shift+H
Show everything hidden
Shift+N
Show or hide notes and points
Ctrl+Shift+O
Show or hide the object list
Shaping the selection
H
Turn the selection into a hole
S
Turn the selection back into a solid
T
Make the selection see-through, or opaque again
Shift+M
Multicolor for the selected group: each part in its own colour, or one colour for all
M
Mirror mode
B
Fillet tool for the selected body (again: close it)
Shift+B
Chamfer tool for the selected body (again: close it)
L
Align mode
Alt+Click
On an align dot: match the size instead of moving
Alt+Click
On the equal-gaps dot: type the gap to use
D
Drop the selection onto the workplane
C
Pick up the selection and set it down on a face (like Cruise in Tinkercad)
N
Place a note
Moving and rotating
← / → / ↑ / ↓
Move by one grid step, as the view is turned
Shift+← / → / ↑ / ↓
Move by five grid steps
Alt+← / → / ↑ / ↓
Move by a fifth of a grid step
Ctrl+↑ / ↓
Raise or lower the selection
R
Rotate by 45°
Shift+R
Rotate by 22.5°
Shift
Hold while dragging: move along X or Y only
Alt+Drag
Drag a copy, the original stays put
Alt
Pressed once dragging: pause snapping to other shapes
Alt+Enter
Typing a size beside the shape: grow round the middle instead of from the opposite edge
View and workplane
1 – 6
The six standard views
Shift+1 – 6
Standard view, zoomed to the selection
7 / 8 / 9 / 0
Go to the view saved under that key
Shift+7 / 8 / 9 / 0
Save the view - turn, pan and zoom - for this design
← / → / ↑ / ↓
Turn the view by 15° while nothing is selected
Shift+← / → / ↑ / ↓
Turn the view by 90° while nothing is selected
Ctrl+← / → / ↑ / ↓
Slide the view while nothing is selected
Ctrl+Shift+← / → / ↑ / ↓
Slide the view further while nothing is selected
Home
Fit the whole scene in the view
F or Shift+F
Zoom to the selection
O
Orthographic or perspective
Q
Hide or show the sizes and distances around the selection
+ or −
Zoom in or out
Alt+1 – 0
Pick a snap grid step: the entry of that number in the menu
, or .
Snap grid one step finer or coarser
Middle click
Snap grid menu right at the pointer
W
Place a workplane
Shift+W
Place it on the selected face
Alt+W
Put it back on the base plate
P
Look straight onto the workplane
Shift
Hold while placing to reverse the direction
Esc
Leave workplane or tape measure mode
Help
Ctrl+K
Open the command search
Shift+F1
Turn Interactive Help on or off
Sketch mode
Ctrl+K
Open the command search
Shift+F1
Turn Interactive Help on or off
Esc
Put the tool down (back to Select), then clear the selection
Delete or Backspace
Delete the selected element
Ctrl+C
Copy
Ctrl+X
Cut
Ctrl+V
Paste
Ctrl+D
Duplicate
Ctrl+Z
Undo
Ctrl+Shift+Z or Ctrl+Y
Redo
Ctrl+A
Select every point and line
R
Rotate a closed sketch by 45°
Ctrl+L
Lock or unlock the selected outline or the reference image
N
Place a note
Shift+N
Show or hide notes and points
Ctrl+← / → / ↑ / ↓
Slide the view while nothing is selected
Ctrl+Shift+← / → / ↑ / ↓
Slide the view further while nothing is selected
Home
Fit the whole sketch in the view
F or Shift+F
Zoom to the selection in the sketch
+ or −
Zoom in or out of the sketch
Alt+1 – 0
Pick a snap grid step: the entry of that number in the menu
, or .
Snap grid one step finer or coarser
Middle click
Snap grid menu right at the pointer
Alt+Enter
In a line's length field: grow to both sides
← / → / ↑ / ↓ or Shift+← / → / ↑ / ↓
Move the selected points, lines or image by one grid step (Shift: a larger step, Alt: a fifth of it)
← / → / ↑ / ↓ or Shift+← / → / ↑ / ↓
Move a clicked curve handle by one grid step (Shift: a larger step, Alt: a fifth of it)
1 or 2 or 3 or 4 or 5
Pick a drawing tool: 1 Line, 2 Bezier Curve, 3 Smooth Curve, 4 Add or Remove Points, 5 Freehand (while no line is being drawn)
Shift
While drawing: snap the new line in 15° steps
Shift
While dragging: keep the move on one axis
0-9 or < or Tab or Enter
While drawing: type the length, "<" or Tab for the angle, Enter sets the point